

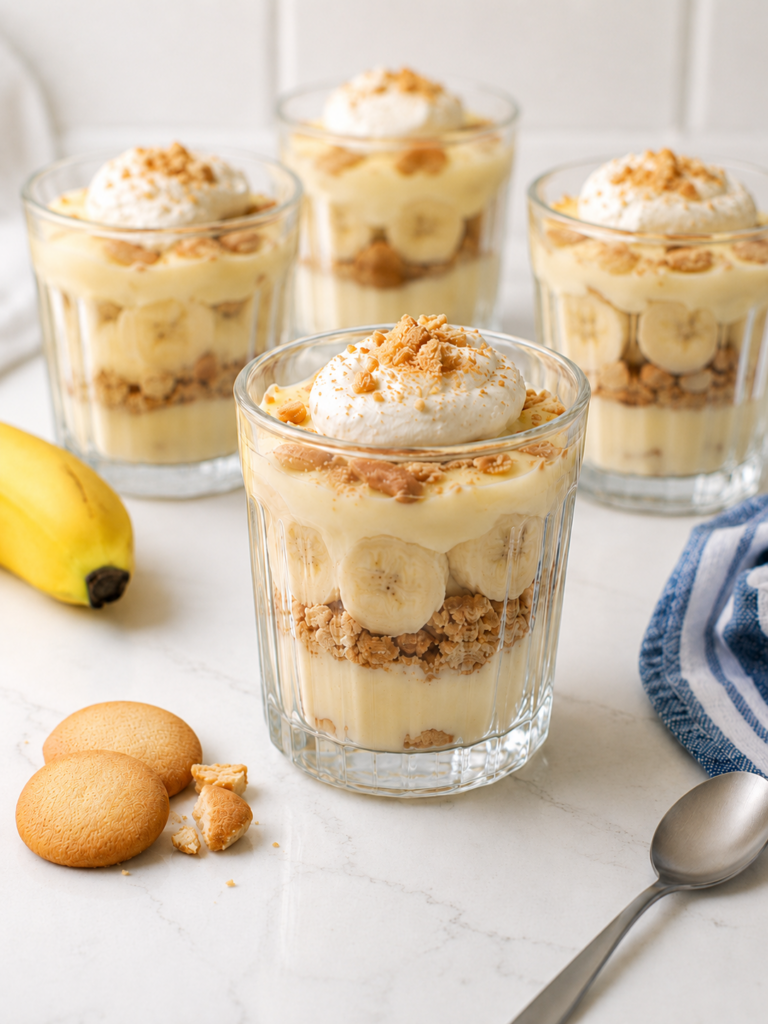
Healthy Banana Pudding
This healthy banana pudding is creamy, cold, sweet, and nostalgic — but made with a few lighter swaps that make it feel better for everyday dessert.
It uses Greek yogurt, vanilla pudding mix, bananas, whipped topping, and vanilla wafers for a no-bake banana pudding that still tastes like the classic.
The goal here is not to make banana pudding “perfectly clean.” The goal is to make banana pudding a little lighter while keeping the creamy texture, banana flavor, and soft vanilla wafer layers that make it worth eating in the first place.
Why You’ll Love This Recipe
This is the kind of healthy dessert that still feels like dessert. The Greek yogurt adds protein and creaminess, the pudding mix keeps it easy, and the vanilla wafers make it taste like actual banana pudding instead of banana yogurt.
It is also no-bake, quick to assemble, and easy to make ahead. You can serve it in a larger dish or layer it into individual jars for meal prep, parties, or weekday sweet cravings.
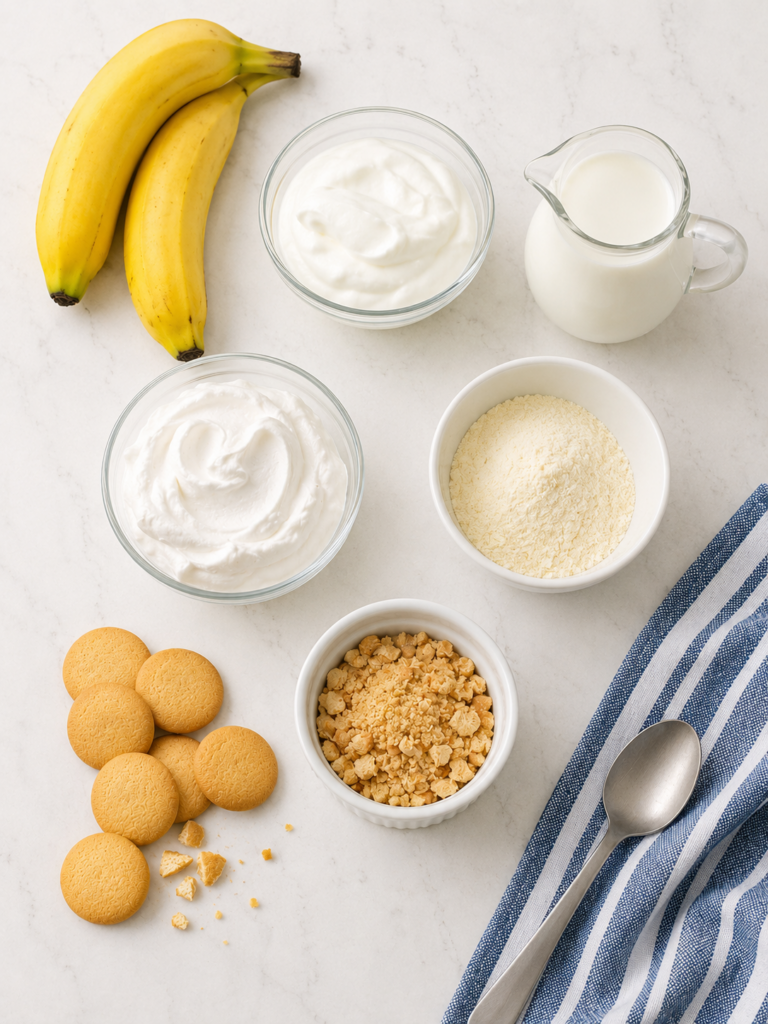
Ingredients You’ll Need
You only need a few simple ingredients to make this lighter banana pudding.
Instant vanilla pudding mix
This gives the recipe the classic banana pudding flavor and thick texture. Regular, reduced-sugar, or sugar-free pudding mix can all work.
Milk
Dairy milk gives the thickest texture, but unsweetened almond milk can work too. If using almond milk, the pudding may set slightly softer.
Greek yogurt
Plain Greek yogurt makes the recipe tangier and less sweet. Vanilla Greek yogurt makes it sweeter and more dessert-like.
Whipped topping
This keeps the pudding fluffy and light. Use regular, light, or dairy-free whipped topping.
Bananas
Use ripe but firm bananas. They should be sweet, but not so soft that they turn mushy in the pudding.
Vanilla wafers
These are essential. You do not need a ton, but a few layers of crushed or whole wafers make this taste like classic banana pudding.
How to Make Healthy Banana Pudding
Start by whisking the instant vanilla pudding mix with cold milk until it begins to thicken. This creates the base of the banana pudding and gives it that familiar creamy vanilla flavor.
Next, whisk in the Greek yogurt until the mixture is smooth. This is the main healthy swap. It adds creaminess and protein without making the pudding feel heavy.
Once the pudding and yogurt are combined, gently fold in the whipped topping. This makes the banana pudding lighter, fluffier, and closer to the texture of a classic no-bake dessert.
Then, layer the pudding mixture with sliced bananas and vanilla wafers. You can do this in a medium serving dish, a trifle-style bowl, or individual jars. For a lighter version, use crushed wafers instead of full layers so you still get the flavor without needing as many cookies.
Chill the banana pudding for at least one hour before serving. If you like soft wafers and a more classic banana pudding texture, chill it for 3 to 4 hours. Add extra crushed wafers right before serving if you want a little crunch on top.
Healthy Swaps That Actually Work
The best healthy swaps are the ones that do not ruin the recipe. For banana pudding, the texture matters. It should be creamy, fluffy, and thick enough to layer.
Greek yogurt works well because it blends into the pudding mixture without making it watery. It also adds protein, which makes the dessert feel a little more balanced.
Using fewer vanilla wafers also works because you still get the classic flavor, especially if you crumble them throughout the layers. You do not need to remove the wafers completely. In fact, removing them completely makes this feel less like banana pudding and more like banana yogurt.
If you want a lower calorie banana pudding, use sugar-free pudding mix, light whipped topping, plain Greek yogurt, and fewer wafers. If you want the best flavor, use regular pudding mix, vanilla Greek yogurt, and a reasonable amount of wafers.
Healthy Banana Pudding Variations
High Protein Banana Pudding
Use a higher-protein Greek yogurt and add an extra 1/2 cup. You can also use a protein vanilla pudding mix if you like the taste.
Low Calorie Banana Pudding
Use sugar-free vanilla pudding mix, unsweetened almond milk, plain nonfat Greek yogurt, light whipped topping, and fewer vanilla wafers.
Banana Pudding Cups
Layer the pudding, bananas, and wafers into small jars or cups for easy single-serve desserts.
Cottage Cheese Banana Pudding
Blend 1/2 cup cottage cheese until completely smooth and use it in place of 1/2 cup Greek yogurt. Only do this if you have a good blender or food processor, because the texture needs to be smooth.
How to Store Healthy Banana Pudding
Store healthy banana pudding covered in the refrigerator for up to 3 days.
The bananas may brown slightly over time, and the wafers will soften as they sit. This is normal and part of the classic banana pudding texture.
For the prettiest presentation, add fresh banana slices and wafer crumbs right before serving.
FAQs
Can I make healthy banana pudding ahead of time?
Yes. This recipe is actually better after it chills for at least 1 hour. If you want the wafers to soften like classic banana pudding, chill it for 3–4 hours before serving.
Can I use almond milk?
Yes, but the pudding may set softer with almond milk. For the thickest texture, use slightly less almond milk or use dairy milk.
Can I make this without Cool Whip?
Yes. You can use homemade whipped cream or another whipped topping. If you skip it completely, the pudding will be thicker and less fluffy.
Is this banana pudding good for meal prep?
Yes, especially if you make it in individual jars. For the best texture, add wafer crumbs right before eating if you want some crunch.
Is banana pudding healthy for you?
Banana pudding is still a dessert, but this version is a more balanced option than many traditional recipes. It uses Greek yogurt, bananas, and a lighter layering approach while still keeping the classic flavor.
PrintHealthy Banana Pudding
A creamy, lighter healthy banana pudding made with Greek yogurt, bananas, vanilla pudding mix, whipped topping, and vanilla wafers for an easy no-bake dessert that still tastes classic.
- Prep Time: 10 minutes
- Total Time: 1 hour 10 minutes
- Yield: 4 servings (about 1 cup each)
- Category: Dessert
- Cuisine: American
Ingredients
- 1 box instant vanilla pudding mix, regular or sugar-free
- 1 1/2 cups cold milk (recommend 2%) or unsweetened almond milk (may not set as well)
- 1 cup Greek yogurt, plain or vanilla
- 1 cup whipped topping (thawed if frozen)
- 2 medium bananas, sliced
- 18–24 vanilla wafers, roughly crushed or layered
- Optional: pinch of cinnamon or extra banana slices for topping
Instructions
- In a large mixing bowl, whisk together the instant vanilla pudding mix and cold milk for about 2 minutes, until the mixture starts to thicken.
- Add the Greek yogurt and whisk until smooth and creamy.
- Gently fold in the whipped topping until the pudding mixture is fluffy and evenly combined.
- Add a thin layer of the pudding mixture to the bottom of a serving dish or individual jars.
- Add a layer of sliced bananas and a sprinkle of crushed vanilla wafers.
- Repeat the layers until all ingredients are used, finishing with pudding on top.
- Cover and refrigerate for at least 1 hour before serving. For softer wafers and a more classic banana pudding texture, chill for 3–4 hours.
- Top with extra crushed wafers right before serving if you want a little crunch.
Notes
- For a sweeter banana pudding, use vanilla Greek yogurt. For a less sweet version, use plain Greek yogurt and regular pudding mix.
- If using almond milk, choose a pudding mix that sets well with non-dairy milk, or use slightly less milk for a thicker texture.
- For the best texture, add a few fresh wafer crumbs right before serving.

Get the Weekly Wellth Newsletter
Stay up to date & receive the latest posts in your inbox.